Chapter 40 - py2exe
The py2exe project used to be the primary way to create Windows executables from your Python applications. The regular version of py2exe just supports Python 2.3-2.7. There is a new version listed on PyPI that will work with Python 3.4 as well. We will focus on the Python 2.x version, although this chapter should work with the Python 3 version too.
You have several choices for your application. You can create a program that only runs in a terminal, you can create a desktop graphical user interface (GUI) or you can create a web application. We will create a very simple desktop interface that doesn’t do anything except display a form that the user can fill out. We will use the wxPython GUI toolkit to help demonstrate how py2exe can pick up packages without us telling it to.
Creating a Simple GUI
You will want to go to wxPython’s website (www.wxpython.org) and download a copy that matches your Python version. If you have a 32-bit Python, make sure you download a 32-bit wxPython. You cannot use easy_install or pip to install wxPython unless you get the bleeding edge Phoenix version of wxPython, so you’ll have to grab a copy that is pre-built for your system either from the wxPython website or from your system’s package manager. I recommend using at least wxPython 2.9 or higher.
Let’s write some code!
import wx

class DemoPanel(wx.Panel):
    """"""

    def __init__(self, parent):
        """Constructor"""
        wx.Panel.__init__(self, parent)

        labels = ["Name", "Address", "City", "State", "Zip",
                  "Phone", "Email", "Notes"]

        mainSizer = wx.BoxSizer(wx.VERTICAL)
        lbl = wx.StaticText(self, label="Please enter your information here:")
        lbl.SetFont(wx.Font(12, wx.SWISS, wx.NORMAL, wx.BOLD))
        mainSizer.Add(lbl, 0, wx.ALL, 5)
        for lbl in labels:
            sizer = self.buildControls(lbl)
            mainSizer.Add(sizer, 1, wx.EXPAND)
        self.SetSizer(mainSizer)
        mainSizer.Layout()

    def buildControls(self, label):
        """
        Put the widgets together
        """
        sizer = wx.BoxSizer(wx.HORIZONTAL)
        size = (80,40)
        font = wx.Font(12, wx.SWISS, wx.NORMAL, wx.BOLD)

        lbl = wx.StaticText(self, label=label, size=size)
        lbl.SetFont(font)
        sizer.Add(lbl, 0, wx.ALL|wx.CENTER, 5)
        if label != "Notes":
            txt = wx.TextCtrl(self, name=label)
        else:
            txt = wx.TextCtrl(self, style=wx.TE_MULTILINE, name=label)
        sizer.Add(txt, 1, wx.ALL, 5)
        return sizer

class DemoFrame(wx.Frame):
    """
    Frame that holds all other widgets
    """

    def __init__(self):
        """Constructor"""
        wx.Frame.__init__(self, None, wx.ID_ANY,
                          "Py2Exe Tutorial",
                          size=(600,400)
                          )
        panel = DemoPanel(self)
        self.Show()

if __name__ == "__main__":
    app = wx.App(False)
    frame = DemoFrame()
    app.MainLoop()
If you run the code above, you should see something like the following:

Let’s break this down a bit. We create two classes, DemoPanel and DemoFrame. In wxPython, the wx.Frame object is what you use to create the actual “window” that you see in most cases. You add a wx.Panel to give your application the proper look and feel and to add tabbing between fields. The panel object’s parent is the frame. The frame, being the top level widget, has no parent. The panel contains all the other widgets in this example. We use sizers to help layout the widgets. Sizers allow the developer to create widgets that will resize appropriately when the window itself is resized. You can also place the widgets on the panel using absolute positioning, which is not recommended. We call the MainLoop method of the wx.App object at the end to start the event loop, which allows wxPython to respond to mouse and keyboard events (like clicking, typing, etc).
Now we’re ready to learn how to package this application up into an executable!
Note: I tested on Windows 7 using Python 2.7.3, wxPython 2.9.4.0 (classic) and py2exe 0.6.9.
The py2exe setup.py file
The key to any py2exe script is the setup.py file. This file controls what gets included or excluded, how much we compress and bundle, and much more! Here is the simplest setup that we can use with the wx script above:
from distutils.core import setup
import py2exe

setup(windows=['sampleApp.py'])
As you can see, we import the setup method from distutils.core and then we import py2exe. Next we call setup with a windows keyword parameter and pass it the name of the main file inside a python list object. If you were creating a non-GUI project, than you would use the console key instead of windows. To run this snippet, save it into the same folder as your wxPython script, open up a command prompt and navigate to the location that you saved the two files. Then type python setup.py py2exe to run it. If all goes well, you will see a lot of output ending with something like this:
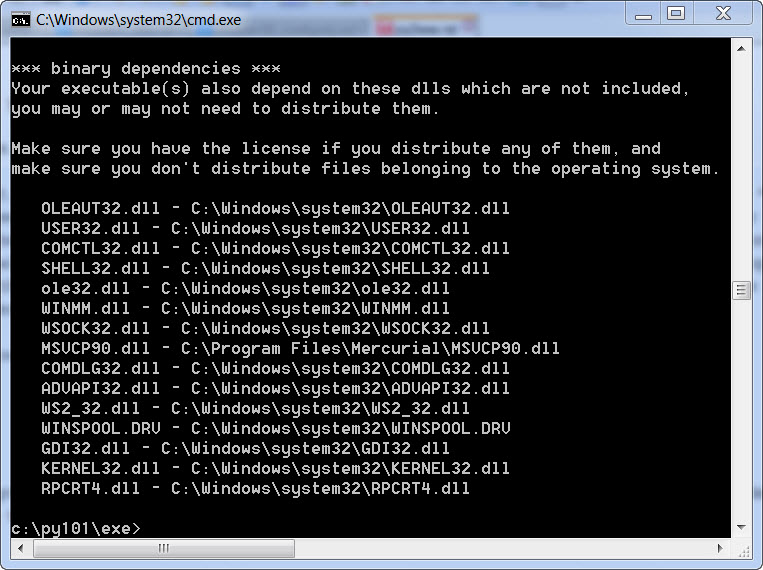
If you happen to use Python 2.6, you might get an error about MSVCP90.dll not being found. Should you see that error, you will probably need to go find the Microsoft Visual C++ 2008 Redistributable Package and install it to make the DLL available on your system. Occasionally you will create the executable and then when you run it, it just won’t load correctly. A log file is normally created when this happens that you can use to try to figure out what happened. I have also found a tool called Dependency Walker that you can run against your executable and it can tell you about non-Python items that are missing (like DLLs, etc).
I would like to point out that the setup.py file doesn’t explicitly include wxPython. That means that py2exe was smart enough to include the wxPython package automatically. Let’s spend some time learning a bit more about including and excluding packages.
Creating an Advanced setup.py File
Let’s see what other options py2exe gives us for creating binaries by creating a more complex setup.py file.
from distutils.core import setup
import py2exe

includes = []
excludes = ['_gtkagg', '_tkagg', 'bsddb', 'curses', 'email', 'pywin.debugger',
            'pywin.debugger.dbgcon', 'pywin.dialogs', 'tcl',
            'Tkconstants', 'Tkinter']
packages = []
dll_excludes = ['libgdk-win32-2.0-0.dll', 'libgobject-2.0-0.dll', 'tcl84.dll',
                'tk84.dll']

setup(
    options = {"py2exe": {"compressed": 2,
                          "optimize": 2,
                          "includes": includes,
                          "excludes": excludes,
                          "packages": packages,
                          "dll_excludes": dll_excludes,
                          "bundle_files": 3,
                          "dist_dir": "dist",
                          "xref": False,
                          "skip_archive": False,
                          "ascii": False,
                          "custom_boot_script": '',
                         }
              },
    windows=['sampleApp.py']
    )
This is pretty self-explanatory, but let’s unpack it anyway. First we set up a few lists that we pass to the options parameter of the setup function.
- The includes list is for special modules that you need to specifically include. Sometimes py2exe can’t find certain modules, so you get to manually specify them here.
- The excludes list is a list of which modules to exclude from your program. In this case, we don’t need Tkinter since we’re using wxPython. This list of excludes is what GUI2Exe will exclude by default.
- The packages list is a list of specific packages to include. Again, sometimes py2exe just can’t find something. I’ve had to include email, PyCrypto, or lxml here before. Note that if the excludes list contains something you’re trying to include in the packages or includes lists, py2exe may continue to exclude them.
- dll_excludes - excludes dlls that we don’t need in our project.
In the options dictionary, we have a few other options to look at. The compressed key tells py2exe whether or not to compress the zipfile, if it’s set. The optimize key sets the optimization level. Zero is no optimization and 2 is the highest. By setting optimize to 2, we can reduce the size of folder by about one megabyte. The bundle_files key bundles dlls in the zipfile or the exe. Valid values for bundle_files are:
- 1 = bundle everything, including the Python interpreter.
- 2 = bundle everything but the Python interpreter
- 3 = don’t bundle (default)
A few years ago, when I was first learning py2exe, I asked on their mailing list what the best option was because I was having issues with bundle option 1. I was told that 3 was probably the most stable. I went with that and stopped having random problems, so that’s what I currently recommend. If you don’t like distributing more than one file, zip them up or create an installer. The only other option I use in this list is the dist_dir one. I use it to experiment with different build options or to create custom builds when I don’t want to overwrite my main good build. You can read about all the other options on the py2exe website.
The py2exe package does not support including Python eggs in its binaries, so if you have installed a package that your application depends on as an egg, when you go to create the executable, it won’t work. You will have to make sure your dependencies are installed normally.
Wrapping Up
At this point, you should know enough to get started using py2exe yourself. You can get busy and start distributing your latest creation now. It should be noted that there are several alternatives to py2exe, such as bbfreeze, cx_freeze and PyInstaller. You should try at least a couple of the others to see how they compare. Creating executables can be frustrating, but have patience and persevere through it. The Python packaging community is quite willing to help. All you need to do is ask.